
Capturing the light – How to photograph lighting
Photography itself can be defined as “recording the light”. As important as it is, to capture the best lighting, it is extremely hard to get the perfect lighting in photography. There is a limit that a camera can reach without good lighting. Thus, in order to capture a striking picture, light source is a critical point.

Lighting in photography plays a vital role in the field of photography. Good lighting capture the colors, form and texture better. Thus, examining light is crucial factor. Here are few guidelines as to how the light for photography should be examined.

- Observe how light works – Examine how the daylight works. Accordingly, it can be either:
- Hard light – Produces vivid colors and creates harsh shadows
- Soft light – Produces rather pastel like tones and soft shadows
- Direction of light – Changing the light by moving it around the object can either add or take details away from your picture.
- Color – Softer the lights are calmer the picture might look.
Grasping the light is far more complex than learning the controls of your camera. Therefore, understanding the photography lighting is essential because even the most expensive camera lens will be useless inside of a dark room.
- Recognize the color temperatures – color temperature is known as the characteristics of visible light to the naked human eye. Hence, red and yellow colors are considered to be warm colors that have low temperature while blue and white colors have high temperature.
- Identify the natural light – Sun is the basic source of light. When shooting in the daylight, various colors, light effects and tones can be captured from different angles at different times of the day.
-
- Morning light – Morning is the best time of the day to capture the best tones and the morning sunlight brings out blue hues which creates a crispy effect in pictures.
-
- Cloudy day – The softer light produces calmer images and take away the harsh details.
-
- Noon light – Produces much detailed pictures with harsh shadows.
-
- Afternoon lights – Gives warmer shades of yellow and red for pictures.
-
- Sunrise and sunset – offers more flattened out lighting with orange and pink tones

- Detect the harness or the softness of light – Photographs taken in the noon can have more bright and contrast colors and hard shadows than the ones taken in an overcast day which gives evenly distributed soft lights.
- Note the direction of light – Shadows and details can be added or removed from a photograph by shooting the same object in different angles. The effect is same even if you move the light around the subject.
Taking the perfect picture might not always require a DSLR camera. If you know how to utilize the lighting accurately, even a normal camera or a smartphones camera might will do the job as good. Catching good lighting is all about understanding the light and building up photo lighting effects.
Let’s take a quick look at some basic photography lighting techniques and effects.
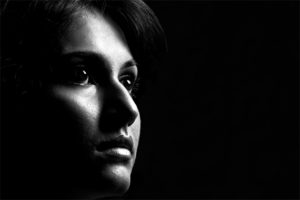

- Split lighting – This is a technique where you can get rather a dramatic picture by providing light only to a half of the subject and keeping the other half in shadows.
- Butterfly lighting – To get a slimmer face, butterfly effect is the best technique that can be used. Here the shadow is placed right beneath the subject’s nose.
- Loop lighting – This is the easiest lighting technique to achieve and it creates a loop shaped shadow under the subject’s nose.
- Rembrandt lighting – A triangle of shadow no longer than the nose and no wider than the eyes are placed on the cheek of the subject to create a dramatic picture.
- Short lighting – This technique possess more 3D qualities as the subject’s face is directed at the camera lens.
- Broad lighting – Here, most of the subject’s face is lighted. It creates an illusion of a broader face so it’s beneficial in photographing a thin face.
Photography is all about exploring thus no one needs to stick to the rules but create their own lighting effects through experimenting.